Disclaimer: I’ve wrote this guide for my teammates that started diving in Mercurial. They came with Subversion background and after looking how they are working with Mercurial I wanted to show them one of more flexible workflows. It’s not a definitive guide. Just one of the ways to manage multiple work items with Mercurial and TortoiseHg 2.0. Oh, and it’s illustrated…
The Story, a real one…
One of the devs was working on a feature and wanted to push it to remote repository. Feature, being incomplete/not finished/full of bugs makes using some parts of the app awkward. And/or it’s keeping out other devs working in same source code area. Or the developer wants just push it and go fix an annoying bug he just spotted in other area…
What to do?
First of all, don’t keep it local! You should not try keep your modifications local. Mostly because your PC is not as reliable as our servers and also work you do isn’t visible to other team members.
Let’s formulate the problem: have ability to manage few work items simultaneously.
When it’s useful?
- A piece of work (issue/ticket/feature/bug) you’re tackling currently can take multiple days to implement. Even weeks.
- Multiple work items are useful when you have to quickly fix a bug in ‘default’ line when keep working on another feature
- You can share your unfinished work or ask an advice/review on it from your teammates
- You want to do something experimental, a crazy idea to try and then throw it to recycle bin.
Solution?
One of the options is use** Mercurial named branches**. I’ll describe a small workflow (with pictures, so you don’t get bored) describing how you can manage multiple work items at the same time.
Here is the algorithm, to get you on the track. It’s command line log with commentaries:
hg branch ticket-17                        // creating branch ‘ticket-17’
(do some changes)
hg commit –m “my commit message”           // committing to the branch
(more work, more commits)
hg update default                          // switching to default line
hg merge ticket-17                         // merging branch ‘ticket-17’ to default line
hg commit                                  // committing your merge
And that’s all. I hope you’ve got the idea.
How to do it with Tortoise HG 2.0
Configuration
To be able to push your branches to remote repository you have to configure TortoiseHg to allow new branches.
The picture:
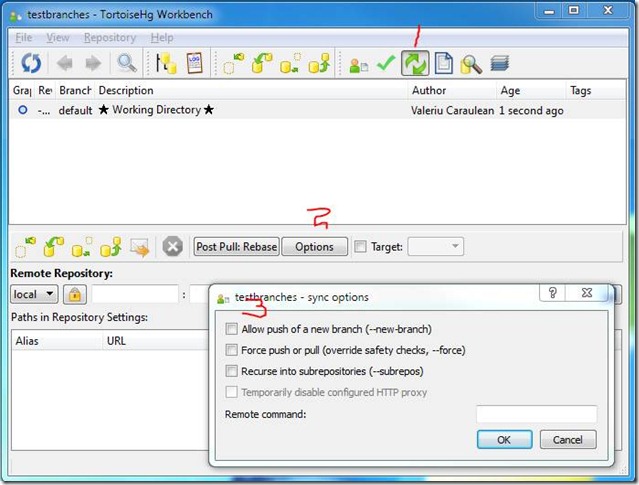
Steps:
- Click Synchronize
- Click Options
- Check “Allow push of a new branch”
Create new named branch
The picture:
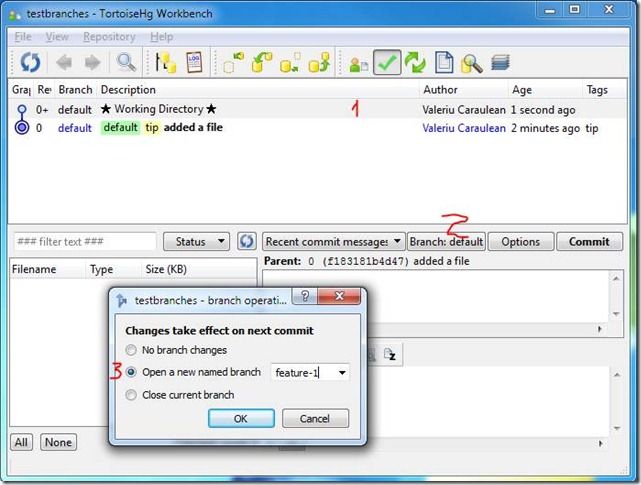
Steps:
- Select the working directory in log view
- Click on button with name of current branch - “Branch: default”
- Select Open a new named branch and give it a name. Short and clean. Or long but anyway clean & descriptive.
When you’ll press OK your current branch button will change to “New branch: feature-1”
Get the work done and commit to your new branch
No pictures here as working with code is a very intimate process.
Just be sure you’re committing to the right branch.
Update to default branch
Picture:
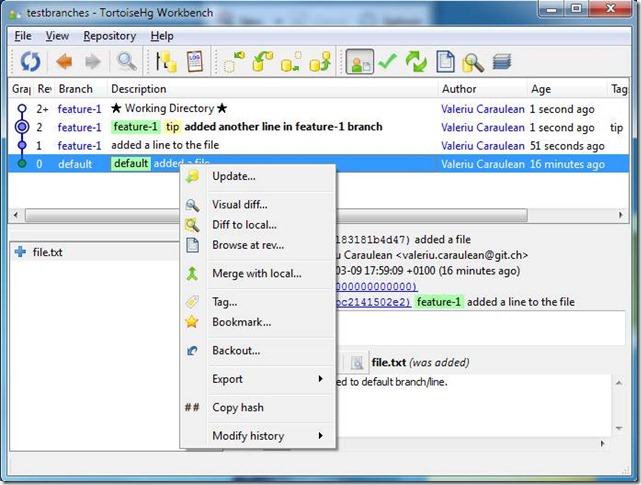
Steps:
- Select the “head” of default branch (the green label with name of the branch). Or, if you want to get creative, another branch where you want to integrate the “feature-1”.
- Click “Update…”
Merging changes from feature-1 to default
The picture:
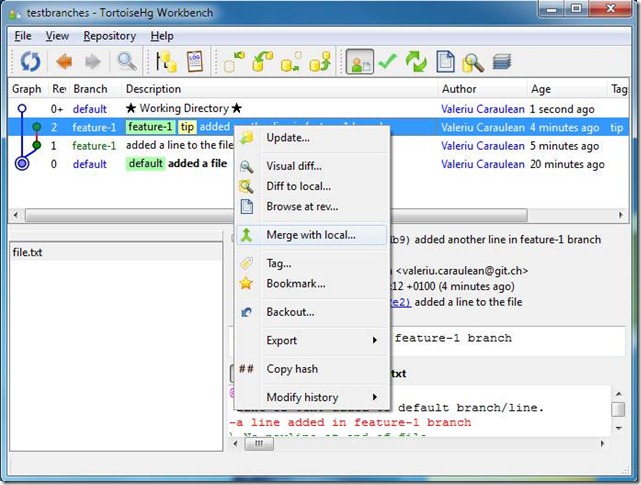
Steps:
- Ensure your working directory is default branch.
- Click on the head of “feature-1” branch and choose “Merge with local…”
A Merge dialog will open:
- Review one more time the what you’re about to do
- Click Merge
- You’ll be asked to commit your merge. Change message if you want and do commit.
You’re done!
Well, almost… Now when you’ll push to remote repository the “feature-1” branch will be also pushed and everyone will have access to it. And your work backed up on the server.